THE CONFECTIONIST: holidays
Showing posts with label holidays. Show all posts

Monday, December 13, 2010

little balls of cake

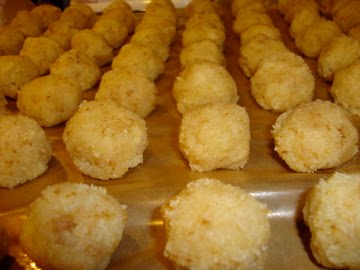
It's that time of year again, when people find reasons to stay in and warm up by the fireplace with a cup of hot cocoa and some delicious treats. For my annual holiday party I decided to make cake balls with my favorite Amy's Bread yellow cake recipe. Tasting one of these delicacies is like sampling a piece of utopia. I spent a lot of time making over 70 of these drops of heaven. So you can imagine by the end of a long day—full of cake, frosting and chocolate—I was utterly relieved to share with my friends. Believe me, they were delighted too.

The power of these chocolate coated cake balls will stop you and send you into a world of bliss. The thought of biting through a chocolate shell into a soft sweet cake continues to marvel me, as the differing textures are so compatible together. I would definitely suggest learning some patience with this dessert and having at least three dish towels nearby...let's just say that by the end of the day my kitchen was happily covered in sugar, flour and chocolate.


Directions:
Bake AMY'S YELLOW CAKE and BUTTERCREAM FROSTING. When the cakes are out of the oven and still warm, dump them into a big mixing bowl. Pour the frosting over the cake—this will be messy. Use your hands (if you don't mind) to mix the cake and frosting. It should be very mushy. Make small balls with the mix. Place the cake balls on a baking sheet and place in freezer for at least 1 hour. Take bakers chocolate and melt in a double boiler (it's good to use a candy thermometer to keep the chocolate at the right temperature). Have the cake balls ready. Use a toothpick to insert into the cake balls and one by one dip in the chocolate. Place the chocolate-coated cake balls back on the pan. Repeat until all of the cake balls are coated. Place in freezer until ready to be served. I enjoyed getting extra fancy by melting more chocolate for drizzling and sprinkles for fun (sorry that I only have pictures from the first few steps of the baking process, but understand that few confections last long enough for a proper photo shoot in my house).

happy indulging!!

Monday, December 7, 2009

cookie presses and soirées


With cool weather consuming all of Texas, snow falling earlier this week, and heaters turned up, I noticed some things missing—the smell of fresh cookies and the sound of jolly holiday music. This led me to hosting a holiday party, for a little over 50 of my friends.
Amongst the different cheeses, crackers, colorful chocolates and festive libations (including eggnog and sparkling cider), were frosted sugar cookies.
Days earlier, my mom and I thought a cookie press would be a good investment. I hesitated at this purchase, for I generally follow the traditional rolling pin and cookie cutter guideline for making cookies. With technology booming and our society advancing daily, I thought I should give William Sonoma a chance. I took my cookie press back to Austin, eager to put it to use. My friend, Elana, came over to assist. We made our dough, let it cool in the refrigerator, and after some time we put the dough in the press. We followed the instructions, even watched a "how-to" YouTube video, and still struggled with the cookie press.
A cookie press should be simple: you put the dough in, slip on the shaping disk, press onto your cookie sheet, and voila your snowflake-shaped cookies are ready to bake! Well, my experience was quite different. I would call this gadget a "Cookie PYHO" (Cookie Press Your Heart Out), because it took my whole body to press the lever. You may be thinking, it's because your dough was too firm from post-refrigeration...but you're wrong. I let the dough sit for a while until it softened, and I still felt like I was getting a workout. My other complaint is that I had to actually cut the dough off of the press.
This gadget is supposed to make our lives easier!! It made my baking experience quite chaotic. I plan on returning William Sonoma's Cookie Press immediately, so don't buy it. I think I'll be just fine sticking to my traditional ways of baking with a rolling pin and cookie cutters.
On a sweeter note, my cookies were a hit! I just love decorative sprinkles and colorful icing this time of year—they make for an even jollier holiday!

my own incredible holiday cookie recipe:
2 cups bread flour
1/2 tspn baking powder
1/4 tspn salt
1 egg
1 cup sugar
1 tspn vanilla
1 stick (8 tablespoons) vegan butter (Earth Balance)

Dry Ingredients:
Mix ingredients in a bowl, stir flour baking powder and salt together—set aside

Wet Ingredients:
Beat the butter and sugar in a bowl until creamy, add the egg and vanilla, continue mixing until creamy.

Add the wet ingredients to the dry, mix well until dough begins to take shape. Wrap in plastic put in refrigerator for 1 hour. Remove, roll out and use cookie cutters for fun cookies. Bake at 350 degrees for about 11 minutes. Depending on your oven, you may need to bake the cookies for a minute or two longer.

ROYAL ICING (foodnetwork.com):
2 large egg whites
3 tspn lemon juice
3 cups powdered sugar
add food coloring if desired

mix all together- add sugar slowly until shiny— be sure it forms glossy peaks.Frost sugar cookies. Add sprinkles if desired.

Bon Appétit and happy holidays!!

~the confectionist